Monday, 16 December 2013

Finally, Winter Break!

Winter break! Finally!

During this last week, the excitement for winter break was definitely palpable. On Monday, we all came into class with the hope that Chef would give us Thursday off. Chef waffled. He doesn't have the authority to give us a day off, but by Tuesday, he gave in saying that as long as we finished everything and cleaned up the classroom by Wednesday, he'd cover for us. :D

Monday entailed more enrobing. This time the filling was piped onto disks of chocolate before being dipped. My partner and I made a peach butter ganache filling - buttery and rich with a smooth peachy flavour running through it. The key to properly piping them was to start 1/2" above the disk and don't move! Just apply constant pressure so the filling would form a fat base and come to a point at the top.


We also dipped some round chocolates and then rolled them on a metal screen to give them a spiky appearance.


Tuesday was practical day. Remember the chocolate box from last week? Well this time it was for real, plus 14 salted caramel chocolates on top. I didn't get any pictures during the process because I was trying to be fast and efficient. We will be remaking these for our capstone at the end of the year and Chef recommended getting the box done in 2-3 hours.


Overall the box went fairly well. No broken petals this time! I did struggle with the individual chocolates. I found that while pouring the final layer of chocolate onto the moulds, it would often push the filling out making holes where the caramel could escape after they were unmoulded! Frustrating. It was only during my evaluation that Chef revealed a better approach to finishing the chocolates. Thaaaanks. :P

So with the curriculum in this class done, what did we have left to do? A showpiece of course! We use up the leftover chocolate that has been colored or tempered and make something nice with it. However, by Wednesday, most of my classmates, myself included, were just not in the mood.

A paint sprayer we used to spray chocolate onto our base board.
Gluing on the reindeer's legs

The class was divided into two groups, each deciding their own variation on the theme. The theme was a sled with at least 2 reindeer. I was just so tired of school by Wednesday that I really didn't contribute to the final piece, as sad and terrible as that is. I covered the supporting base board with white chocolate, pieced together some presents, and helped move things around. But other than that, I stayed back. The one time I did try to contribute, my team mates got a little snippy. (We had a few controlling members on our team so there was some passive-aggressive tension going on.)

Nevertheless, our class turned out some nice looking pieces. I was very impressed by the sculpting abilities of the other group. Of course, the Santa on ours is just as impressive, but he's hidden by the reindeer and sub-par sled.

Awesome Santa - all hand sculpted!
The other group's sled. Very cute!

But, I am not going to end this post on such a negative note. We all cleaned up, cheered that we were done, and feasted on pizza! While I wasn't too helpful with the showpiece, I did help make pizza for the class. And what good pizza it was!

We all needed a break and we finally get one! Come January, I'll be ready to tackle the rest of this year and push through. Merry Christmas and have a wonderful New Years! :D

Saturday, 7 December 2013

Dipping and Flowers

This semester is almost over! One more week and it'll be winter break. Is everyone enjoying this seriously cold winter? :)

This week we moved onto enrobing chocolates. Enrobing is like the opposite of moulded chocolates. Instead of filling a cavity of chocolate, you take the filling and dip it in chocolate. It is actually pretty tricky to dip the bonbon and put it down without getting a "foot" of chocolate.

Making a transfer sheet to decorate my chocolates
Dipping a cherry marzipan filling

Here are some pictures of a method of tempering called tabling, or marbling. It is much faster than the usual seeding method, but requires a cold surface such as marble. Wood or steel tables heat up too fast and hold the heat. Tabling involves melting all your chocolate to 45C then pouring 2/3 of it onto marble. Using a palette knife or paint scraper, you spread the chocolate out then scrap it all back into the center. Continue this until the chocolate starts to get thick. Scrap all the chocolate back into the bowl with the remaining 1/3 and when stirred together, the resulting chocolate should be, ideally, at its proper working temperature. Tabling can be a bit messy, but I like it for its speed. And its a lot of fun.

Spread
Scrape

The final in this class is to make a chocolate box and 12 chocolates to fill the box. We had the chance to practice the chocolate box this past week. The box itself is fairly simple - cut out the top and bottom pieces then wrap a piece of chocolate covered acetate around the base to create the walls. I found it hard to make the petals uniform and nice but I think it turned out fairly well. Just after taking this picture, I broke off a few petals trying to package it. Frustrating!

So fragile!

In the upcoming week we'll finish up enrobing fillings and other confections as well as make our chocolate boxes. This time, I'll be sure to be more careful with my flower. I do not want to be attempting to mend it on the fly. :P

So many chocolates!

Saturday, 30 November 2013

Ending the Year with Chocolate

Last class before Christmas break! Right away we started Chocolates class with making the Eiffel tower. Ready or not, you better wake up! :P

Although the tower itself wasn't difficult, it took a surprising amount of time to build simply because pieces kept breaking! It was frustrating at times, to say the least. But at least it all came together in the end. "Pretty good for a first time," said Chef.


From there we moved onto chocolate bars. SAIT sells two chocolate bar flavours: passionfruit and salted caramel. At the end of last year, when I was a first year, we all had the chance to design the wrappers for the chocolate bars. But in the end, the school just decided to use the previous design again! What a disappointment. I know there were some really awesome wrapper designs.

To make chocolate bars, or any chocolates, you start with tempering chocolate. The nice cold marble of the chocolate room makes it much faster to temper the chocolate, but it also sets the bowl of tempered chocolate really quickly too! (Partially set chocolate leaves you with chunkies - not fun to work with.)

Colouring the moulds

After tempering and preparing the moulds, chocolate is poured in. The sides of the mould are scraped for cleanliness and then the whole mould is flipped upside down to pour our the excess chocolate. The mould is then left upside down so any excess can drip off.

Tapping out excess

Once the chocolate sets, it gets filled and then topped with more chocolate. After each filling of chocolate, the moulds get tapped to get out all the air bubbles.

Tap it pretty hard!

All the bars get put into the freezer (to speed up the process) and then they get popped out. Look how shiny they are!

Passionfruit
Salted caramel

On Thursday, we split into groups and started making bonbons. The flavour was entirely our own choice. My group chose to make a green tea white chocolate shell filled with a strawberry coulis and a vanilla bean ganache. It turn out really well and tasted really good.


Next week my group will also be making dark chocolate bonbons, milk chocolate bonbons, and cappucino bars. It's gonna be busy!

Saturday, 23 November 2013

The Last of the Bread

We finally finished our last class of bread for the entire program! It was a short week and I'm already missing getting up early in the morning to make some fresh loaves of fluffy goodness.

This week my group switched from the layered flakiness of croissants and danishes to the satisfying bite of bread! Almost constantly throughout the week there was a bag of cheese on our table (both for the bread and a little for ourselves).

Epis, aka wheat stalks, got rolled up with combinations of cheese, ham, herbs, and garlic butter.


We topped our fougasses with generous handfuls of cheeses, olives, sea salt, and garlic powder.

Fougasse come in all shapes

Quiches got the special treatment with bacon along with carmelized onions, and a cheese and herb medley.


And who could forget the classic baguette.


We also made a rye sourdough with bread flowers. I was planning on taking pictures of the flower rolling process on Friday, but class was cancelled due to our Chef catching a cold.

Tasty, but watch out for the pointy ends

Only one class left before the end of this semester. Time, you fly by way too fast sometimes. Before I know it, school will be done and I'll have to go back out into the working world full time. No more four month long summer breaks!

But before any of that, I'll be heading into chocolates class this coming Monday. I hope we get to eat some! :)

Saturday, 16 November 2013

Croissants Galore!

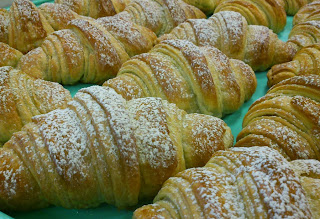
This week was filled with flakey goodness. Once my group switched to doing croissants, we found ourselves with lots of time to be creative with fillings and flavours.

About 180 croissants!

The first day I whipped up a basil and walnut pesto and a caramel apple almond filling while my group members were all about the bacon and cheese. When we ran out of filling, we made chocolate croissants.

A table full of fillings

Then on Friday, my team-mate M really wanted to make a green tea croissant with red bean filling - a mash-up of Asian flavours with European pastries.

Roll them up

How did they turn out? Delicious! I personally would have preferred a stronger green tea taste, but it was all there - the creamy bitter green tea balanced with the sweet red bean. There was only one issue. Their appearance turned out a little squat and the layers separated. We found out that this particular dough recipe can only handle a certain percentage of butter. We added the green tea by mixing it with additional butter and folded that in. The extra butter actually squished the layers we already laminated into the croissant! Chef told us that the recipe we are using, while good for learning and teaching purposes, is not one that would be used for croissants in industry as it is more of a danish dough. 

Green tea and icing sugar dusting
The inside is a little bit green!

I also learned one more key technique when rolling the triangles into the croissant shape. Do not stretch! When I first learned to make croissants at the downtown campus, we were taught to pull the triangle to make it longer and then roll it. But doing so actually destroys the precious layers that you worked so hard to create. It also alters the thickness of the dough, making thinner parts of the croissant bake faster than the thicker parts. Stretching can also make you prone to rolling the croissant too tight. One that has been rolled too tight will burst open while baking. Perhaps it is the dough recipe we are using that is sensitive to stretching, but it is interesting to see how every establishment has their own methods.


Croissants was a fun station and I wish I could spend more time on it. But alas, everything must continue on, so next week is bread! What am I thinking this time? Mushrooms!

Tuesday, 12 November 2013

Artisan Breads and a Sculpture

I hope everyone had a nice long weekend. I actually took some time off so I could visit lots of friends and family. It was a busy week followed by a busy weekend, but here are the pictures from last week.

We started Artisan Breads running. As soon as we came into class, Chef informed us that we were only going to have two days to complete a bread sculpture. This included rolling, cutting, and shaping all your pieces the first day so it could bake and dry overnight. Eek! No time to plan, just make a bunch of things and hope it all comes together. :P

I more or less had the idea of a doing a night and day themed piece so I made a sun and a moon. I also chose a colour palette to fit the theme (darker colours for night and lighter colors for day). As for the rest, I made some stars, some flowers, some leaves, and a bunch of swirled stick-like pieces.

The sun!
The moon with shooting stars

It turned out amazingly well! I was so happy with the result. I do think my piece looks better without the random buns at the base (a requirement), but for two very rushed days and bare minimum planning, I am happy!


The entire piece is made of bread but only the little buns have yeast in them. The sculpture part is made of dead dough, or dough without any yeast. It was then coloured with various powders like beet, tumeric, and spinach.

After finishing our sculptures, we dove right into our rotation. My first station is danishes - the station with the most work out of all four. We only make four danishes, but each one has so many additional pieces, like fillings, that it takes a lot more time than any other station. Friday was a huge scramble to finish everything, but today went much better!

This is a Triple Crown danish. It is an orange cookie bottom with a swirl of flaky danish on top with a little bun of orange brioche hiding inside. While delicious, especially if you like oranges, it feels a little dense because of all the dough, so I whipped up a batch of chocolate ganache and we added a little to the inside. So good! Just like a Terry's Chocolate Orange but in flakey, crispy, buttery pastry form!

Inside of a Triple Crown danish
Just pulled out of the oven
All prettied up with apricot glaze, icing sugar, and a bit of zest

We also make a Rising Star danish which is filled with almond cream and an apple cranberry compote.


And finally, a Pistachio duo danish. I really like this one because we laminate pistachio paste into the dough just like the butter so there is a layer of bright green in the dough. This beauty gets filled with cream cheese and raspberry jam.

Green!
Green, red and white!

One more day of danishes and then my group and I move onto croissants. I feel the urge to make pesto! Pesto swirled croissant, anyone?